Bokeh is the beautiful blur in a picture. It can be used to get rid of a distracting background or just to add some interesting light shapes. In the picture below a cluttered background was blurred out so that we can focus on the main subject.
“Faces at the Pow Wow” by Tony Alter CC BY 2.0
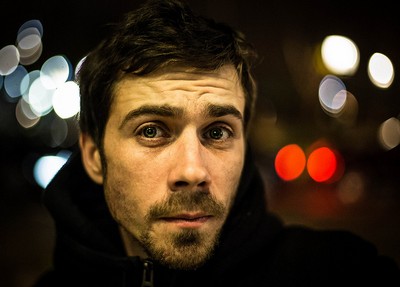
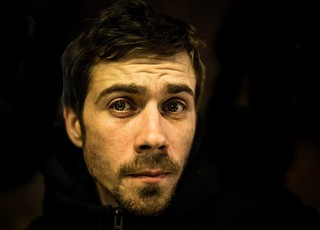
The circles of light in the photo of the man below can also be described as bokeh. I have removed the bokeh in the second picture. Which version do you like better?
“The Real Spank” by Denis Denis CC BY 2.0
“The Real Spank” by Denis Denis CC BY 2.0 Background removed
Step 1 – Use the right lens
To easily blur out a background you need to use a lens with a low aperture number. Look for a lens with f/2.8 or lower. Don’t worry if you only have one lens to choose from. You can still create bokeh in your pictures. Many photographers will use a prime lens with a very low aperture number such as f/1.8 or even f/1.4.
A “prime” lens is a lens that does not zoom. It is fixed at one focal length. A popular prime lens is a 50mm that goes to a very wide aperture of f/1.7 or f/1.8. You can typically find these lenses for less than $150 for most DSLR cameras.
Step 2 – Use the lowest aperture number available on your lens
Set your camera to Aperture Priority (A) mode. This allows you to set the aperture while the camera sets the shutter speed for you. Set your aperture to the lowest number available. Hopefully your lens can go to f/2.8 or even lower.
If your lens can only go down to f/4 or f/5.6 then step 3 and 4 become way more important.
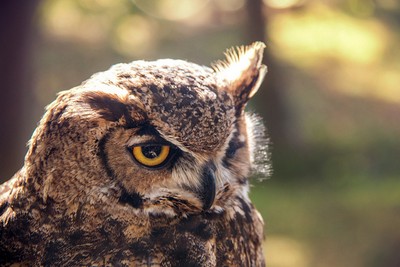
“Buho” by Juanedc.com CC BY 2.0
Remember a low aperture number means the hole that lets in light is very wide. A large aperture number means the hole is small.
f/2.8f/16
Step 3 – Place your subject far away from the background
Step 4 – Get close to your subject
Notice in the diagram below that the camera is close to the subject but the background is far away. This will help you achieve a nice bokeh.
Additional tip:
If you have done everything above and are still having trouble blurring out the background, try using a longer lens. Switch to a 200mm or even 300mm lens. If your camera has a zoom function, zoom all the way in.
A longer lens will help you achieve bokeh.
“Paulinka” by Piotr P CC BY 2.0
Review:
Use the right lens (Pick one with the lowest aperture number)
Set your camera to the lowest aperture number available on your lens
Place your subject far away from the background
Get close to your subject
Use a longer lens or zoom in if you are having trouble
Share Your Thoughts: What photo techniques do your kids want to learn next?
This lesson is all about picking the right light when taking pictures of people. When I first started taking pictures of people I had a hard time. All my pictures turned out terrible and I could not figure out why. The reason I took bad pictures was the light I was choosing.
I once positioned a group of people outside in the middle of the day with the sun shining right in their faces. This is the worst possible light for several reasons:
People squint when the light is too bright.
People’s eyes start watering if they are exposed to that type of light for too long.
Dark shadows are formed under their eyes and nose.
Skin tones are too bright and washed out
Instead I discovered something called the “Window Light Portrait”. Window light is typically more soft and pleasing almost any time of day. By switching to window light you will instantly see an improvement in your pictures.
Step 1 – Pick the right window
Typically a north or south facing window will be best because the sun will never be shining directly into it. You can usually shoot at any time of day when facing north or south.
East and west is a different story because during a sunrise or sunset the light will be coming directly through the window. Direct sunlight through a window will create the same problems I described above.
If you can’t find a compass don’t worry too much, just look for a window with nice soft light coming in. If the sunlight is too harsh use a partially see through white drape over the window. Don’t use a colored drape as that will change the color of the light.
Step 2 – Turn off all interior lights
This may sound strange because we are making it darker. But the reason you should turn off interior lights is because they have a different color than sunlight.
Normal incandescent lights give off orange colored light. If they are left on, your subject’s skin color will look wrong.
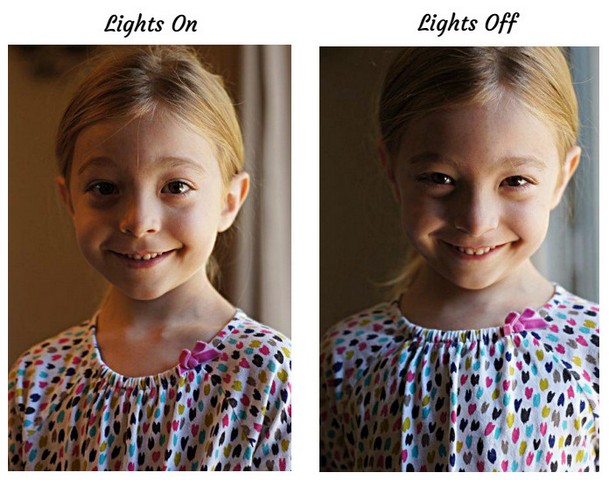
Compare the two pictures below. Do you see how her skin looks orange when the lights are left on?
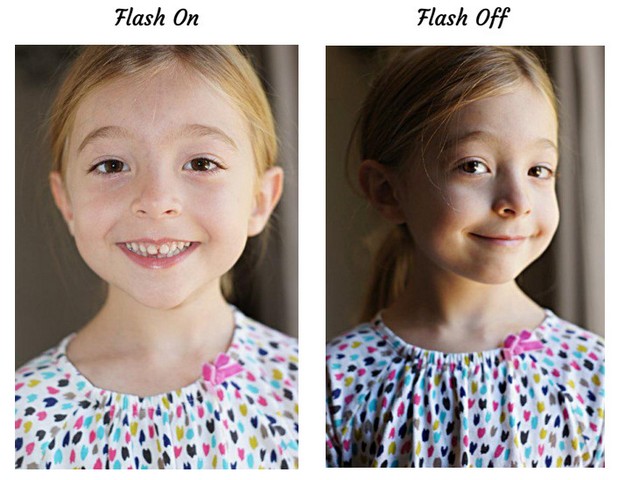
Step 3 – Turn off your flash
In this lesson we are specifically trying to capture the light coming in a window. Therefore turn off your flash. Your flash will overpower the window light and we won’t get the effect we’re going for.
If you cannot turn off the flash in “Auto “ mode switch to “Program (P)” mode.
Compare the two pictures below. You might be thinking the one with flash looks better because it shows more of her face. Unfortunately it flattens out her facial features and is just kind of boring. I enjoy the picture without flash because it seems more interesting and mysterious.
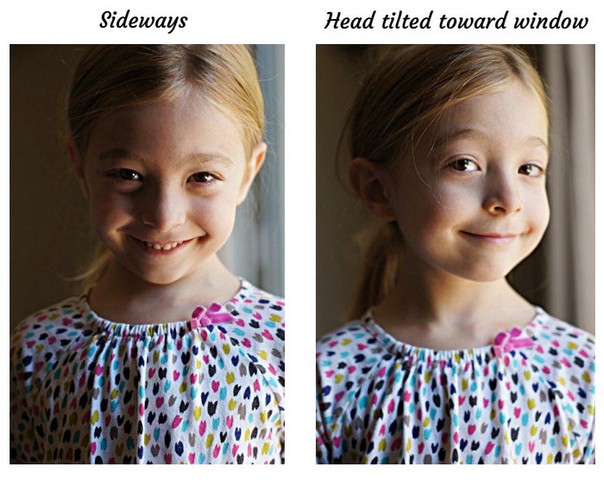
Step 4 – Position your subject
This is the most important step. Start by asking your subject to stand sideways to the window. This will throw light on half of their face.
Now have them turn their head slightly toward the window. This will light their face more evenly. Use your camera in auto mode and experiment with this setup.
Either of these positions is okay. It all depends on the look and effect you are going for.
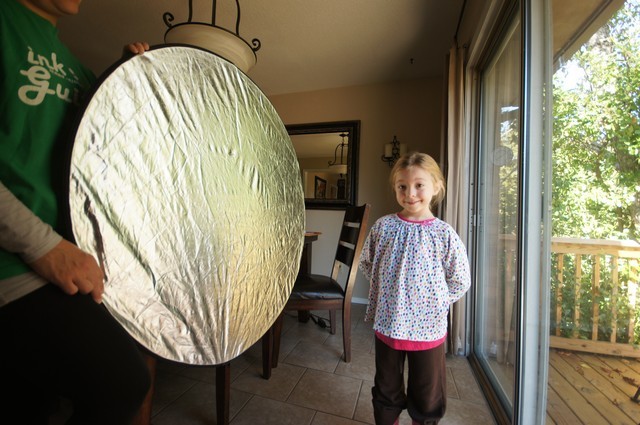
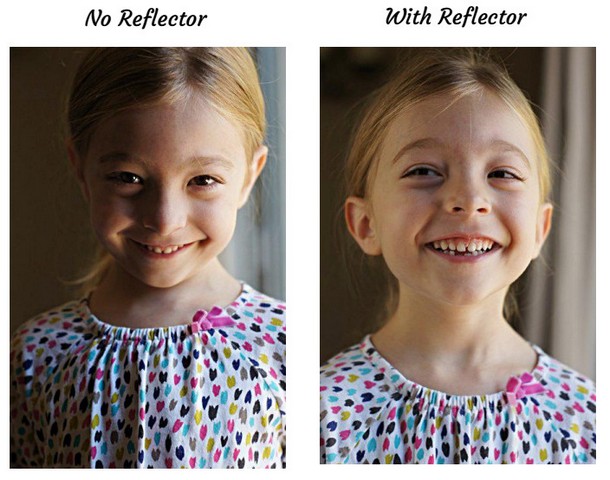
Step 5 – Use a reflector (Optional)
As you can see in most of the pictures above the girl’s face is partially in shadow. Place a reflector on the dark side to add some light.
You can purchase reflectors like the one in the picture above on amazon.com for $10 to $15. Or you can use a white foam core board from Walmart.
Remember: Place your subject between the window and the reflector.
In this lesson we are going to see how your camera can be tricked into taking a silhouette picture. Sometimes tricking your camera can turn out to be a very good thing. A silhouette is when a person or thing is very dark in your picture. The background on the other hand should be bright.
Silhouettes create mystery and allow the viewer to use their imagination to complete the picture.
“Silhouette” by Bea Represa CC BY 2.0
Step 1 – Find an Interesting Subject
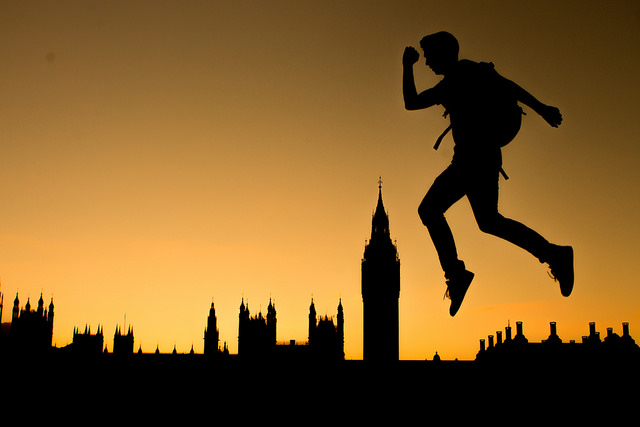
You cannot use the subject’s colors or textures to make the photo pleasing so you have to rely on its shape. Look for subjects that are recognizable by shape alone.
In the photo above you can tell that the main subject is a person jumping. You may also recognize the buildings in the background. Scroll down to find out where these buildings are located.
“Big Ben + Houses of Parliament” by Alex France CC BY-SA 2.0
If you guessed the British Houses of Parliament and The Clock Tower that houses Big Ben in London you were right. Here is a picture during the day.
Pick one of these subjects for a silhouette photo:
• Family members
• Friends
• Toys
• Buildings
• Animals
• Your bicycle
“Silhouette” by Ashley Campbell CC BY 2.0
If you are taking a silhouette of a person have them stand sideways to the camera. This way you will be able to see their eyelashes, nose, and lips. You can probably recognize your family members by looking at the profile of their face. If they are looking straight into the camera you will lose all the detail in their face.
Step 2 – Turn Off Your Flash
The flash will light up your subject which is not the effect we are looking for. Instead have your parents help you turn off the flash on your camera.
If your camera does not allow you to turn off the flash in Auto mode try switching to Program mode. This is the big “P” on your mode dial.
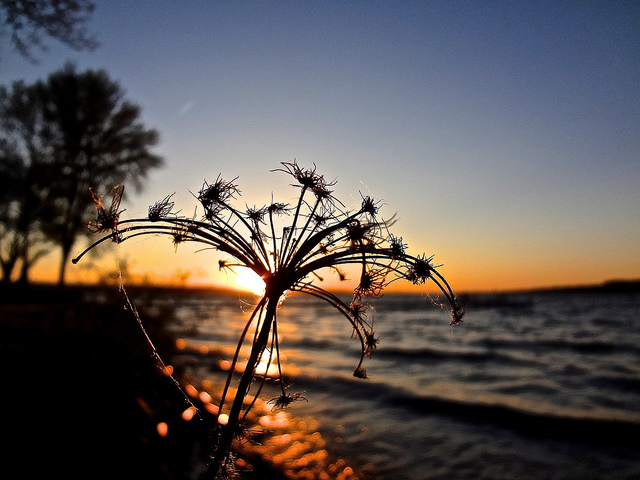
Step 3 – Put Your Subject in Front of a Bright Background
A sunset or sunrise is best for this. See how the flower below is placed right in front of the sunset.
“Shoreline Silhouette” by Chad Cooper CC BY 2.0
You can also use window light as shown in the picture of the toy soldiers below. Find the brightest window in your house. Then create an action scene by setting up some toys on the window sill.
“Toy Soldiers” by Kyle May CC BY 2.0
Step 4 – Trick Your Camera
We must make the camera think that the background is the most important part of this picture.
Use Auto Mode
Your camera takes a meter reading of the light when you press the shutter halfway down. Therefore you can point your camera at the brightest part of the picture and press the shutter halfway down and hold it.
While still holding the shutter halfway down move your camera back to frame your subject where you want it. Finally, press the shutter button all the way down to take the picture.
Some cameras have an AEL button on the back. This stands for Auto Exposure Lock. Instead of pressing the shutter halfway down you can hold down the AEL button instead.
Use Manual Mode
If you are having trouble tricking your camera you might have to switch to manual mode. Turn your mode dial to M. This means you are now in complete control of how light or dark your subject is. Start with these camera settings:
“Staircase Silhouette” by Randy Robertson CC BY 2.0
Exposure Mode: Manual (M)
Aperture: 8
Shutter Speed: 250
ISO: 100
Take the picture and then review it on the LCD screen.
If your subject is not dark enough increase your shutter speed to 500 and try again.
If your picture is too dark decrease the shutter speed to 125 and try again.
Keep experimenting with different shutter speeds until you get the picture just right.
This lesson is about composition. Composition is a big word that means how you position things in your photos. If your kids have played tic tac toe before, then this lesson should be easy to remember.
The Rule of Thirds for Kids
When looking through your camera imagine a tic tac toe grid. This grid divides your picture into thirds. Both the horizontal and vertical sections are split into three sections.
Take a look at the picture below. The horizon was not placed directly in the middle. Instead it was placed closer to the bottom of the picture.
“River Landscape (Issel)” by Uwe Potthoff CC BY 2.0
When we place the horizon in the middle it seems like the picture has been cut in half. This is usually not as appealing to our eyes.
Now when we put a tic tac toe grid over the picture you can easily see that the picture has been cut in thirds. 2/3 of the picture is sky and 1/3 is land. This makes the composition more interesting than simply putting the horizon right in the middle.
“River Landscape (Issel)” by Uwe Potthoff CC BY 2.0 – Grid Added
People
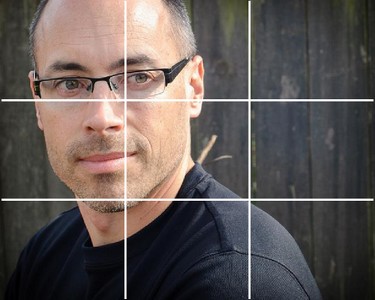
We can also use the rule of thirds when taking pictures of people. The idea is to make sure your main subject is not in the direct middle of your picture.
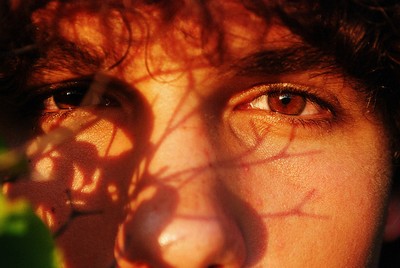
“Self Portrait” by Loren Kerns CC BY 2.0 – Grid Added
Take a look at the picture above. The man’s head was placed on the upper left intersection. He is also looking back into the picture. We must try to imagine what he is staring at off the right side of the photo.
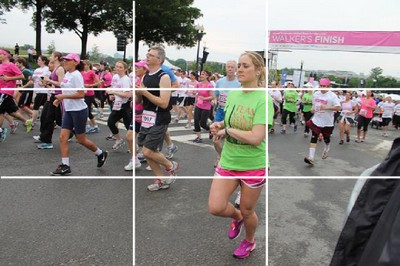
Movement
How can a still picture show movement? Leave room in front of your subjects for them to move into.
“76 Start Runners” by Elvert Barnes CC BY-SA 2.0 – Grid Added
The runner in green is the main subject above. The photographer left plenty of room in front of her. We can imagine her running across the picture. Do the same thing for still subjects. Leave room in the direction they are pointing.
You may also notice that her head is not exactly on a thirds intersection. This is OK. The rule of thirds is not absolute. It is merely a guideline to help you make more interesting pictures.
More Examples
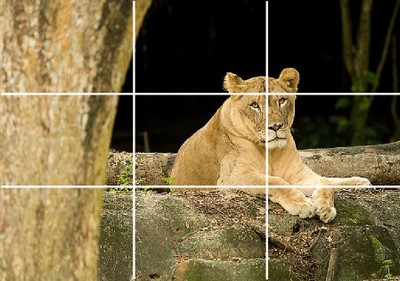
When taking pictures of people or animals; try making their eyes the most important part. Place their eyes near an intersection of the tic tac toe grid.
“Hello, Human” by Chi King CC BY 2.0 – Grid Added
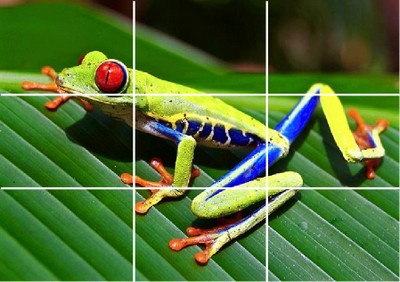
“Tree Frog”
Photography rules are made to be broken. You don’t have to use the rule of thirds all the time. But you need to know the rules before you can break them.
Review
Try not to place your subject directly in the middle of your picture.
Imagine a tic tac toe grid as you are setting up a shot.
Place your main subject on one of the intersections.
When taking landscape pictures place the horizon on either the upper or lower third line. Do not place the horizon directly in the middle.
The golden hour is one of the best times of day to shoot pictures. It actually comes around two times every day. It happens right after sunrise in the morning and right before sunset in the evening.
The quality of light at this time is amazing. It is soft and golden. Skin tones are warmed up giving people a tanned look while shadows are long and diffused. It is quite easy to take great photos during this time of day.
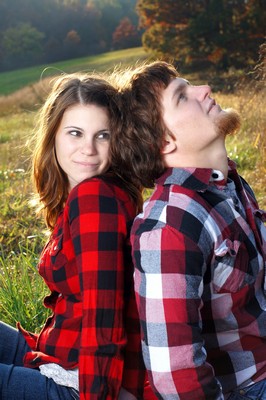
Example of golden hour photography
Take a look at this happy couple. What makes this picture so special is the quality of light. You can see the sun highlighting their hair from behind with that soft golden glow.
Professional photographers add a hair-light all the time in their studios to get a similar effect. You can do it using natural light by putting the sun behind your subject. Compose your shot so that the sun is not in your picture. Otherwise it will look too bright and washed out.
Use a tripod
As the sun gets lower on the horizon the available light will fade out. Your camera will try to compensate for the lower light. Most likely you will start to see blurry pictures. To fix this problem you need to get the camera out of your hands.
Set the camera on a tripod, a table, a rock, or any stable object. Use your camera’s “self timer” instead of pressing the shutter button. This will allow you to keep shooting as the light gets dim. Most self timer buttons use the logo to the left.
What is soft light?
Soft light is characterized by even tones. This means the light is spread out evenly on surfaces which creates less contrast. Shadows are not harsh; instead they blend in with your subject to add just the right amount of interest to your photo. If you were to take a black and white picture in soft light there would be many variations of gray colors as shown in the graphic below.
Soft light happens during the golden hour but it also happens anytime on an overcast day. Don’t put your camera away just because the clouds roll in. This is often the best time to shoot.
What is hard light?
Hard light creates high contrast scenes. This means that shadows will be very dark and reflections of light will be very bright. Hard light happens during midday when the sun is shining down. With the sun directly overhead, people will have ugly dark shadows in their eye sockets and under their nose. One good thing about hard light is that it can make colors more vibrant. The sky will seem more blue and the leaves a deeper green.
If you were taking black and white pictures under hard light there would be mainly whites and blacks as shown in the graphic above. There would not be much gray in the picture.
Soft Light
Hard Light
Time to practice
Try taking pictures of the same thing on a sunny day at noon and also during the golden hour before sunset. When you compare them you should immediately notice how much better your pictures are during the golden hour.
Do you take pictures at noon?
Many professional photographers refuse to take pictures on a sunny day at noon. This is because when the sun is shining directly down it creates hard light. Hard light is not very good for photos of people.
When you are just starting out in photography I would recommend that you do not shoot outdoors during midday to avoid a lot of frustration. One exception to this rule happens on cloudy days. If the sky is overcast then you can shoot all day long and get great photos.
Review
The golden hour happens 1 hour after sunrise and 1 hour before sunset.
If you don’t have to squint it’s a great time for taking pictures of people.
Find soft light when taking pictures of people.
Avoid the harsh midday sun.
Stabilize your camera with a tripod when the light gets too dim.
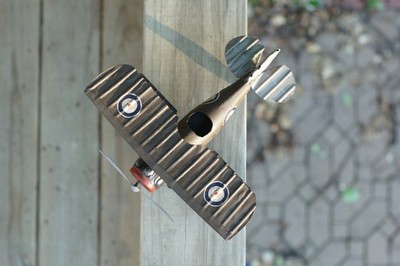
If your child has been taking pictures for very long you may start noticing that they all look the same. This can happen when they always use the same poses or angles. To fix this problem encourage them to take photos of the same subject at many different angles.
The picture of the airplane above would be my first instinct when I see this little airplane. But it may not be the best angle, the best lighting, or the most interesting picture. So let’s keep shooting and see what happens.
Get on the floor
You may need to lay flat on your back and look up to find an interesting shot. Professional photographers are always willing to do something silly to get the best shot. Don’t worry if you look weird doing it. Some of the best pictures happen when you try to shoot a subject in a way it’s never been shot before.
Zoom in
You don’t always have to show your whole subject. Get in close to your subject. In this photo we only see the engine, propeller, and wheels. The wings are not included and that is perfectly fine. This is still an interesting picture even without those other details.
Look down
Get on top of your subject and shoot down. Notice the shadow from the plane’s tail. This is a detail we can’t see from other angles. When shooting from this position try to get directly over the subject and shoot straight down.
Fun photo to try: Get some friends
together and have them lay on the floor with their heads touching each other. Put your camera directly over them and shoot down.
Shoot at eye level
When taking pictures of people or animals you should be on their eye level. When we are talking to someone we tend to look in their eyes. Even animals do this. If you have a pet dog or cat go talk to them and see if they are looking right back into your eyes.
Take a look at the two pictures below. The cat is not making eye contact in the top picture but he is on the bottom. The picture on the bottom allows us to make friends with the cat. It is much more personal and meaningful.
“Cat” by Anna Yoo licensed under CC BY-ND 2.0
“Cat” by Anna Yoo licensed under CC BY-ND 2.0
Review
Try lots of different angles of the same subject
Don’t be afraid of looking silly when finding creative shots
Try shooting at eye level when you are taking pictures of people or animals
Review your pictures later and pick your favorite shots


 To fix this problem you need to get the camera out of your hands.


 Get some friends